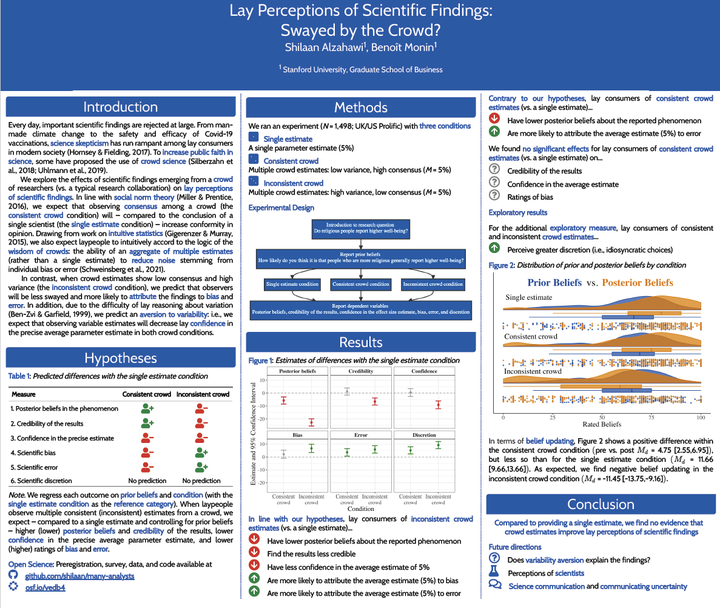
Academic conference posters using {posterdown}
A quick guide to generating reproducible and automatically formatted conference posters in R Markdown

Table of Contents
Motivation
If you know me, you know I like using for just about anything. When it was time to create my first academic conference poster, I knew I didn’t want to waste any time moving between different software environments or copy-pasting and manually formatting text, tables, figures, and results.
Instead, I wanted to generate a fully reproducible and nicely formatted conference poster using R Markdown. Turns out; the R package {posterdown} makes this quite simple! In this post, I’ll briefly show you how to create your own poster using the posterdown package.
For a sneak peek of what you can do with posterdown, you can find my first posterdown creation here and the underlying code here.
Step 1: Install {posterdown}
First, we’ll install the posterdown package.
install.packages("posterdown")
After you’ve successfully installed posterdown, restart R.
Step 2: Open a posterdown template
After you’ve installed posterdown and restarted R, you should now be able to find a few new templates in your RStudio. Navigate toFile > New File > R Markdown ... > From Template
and select any of the posterdown templates.
Click to view screenshot

There are three options available: Posterdown HTML, Posterdown Betterland, and Posterdown Betterport.

While the HTML template looks more like a classic scientific poster, the Betterland and Betterport templates create a poster with a large amount of space dedicated to a main take-away message. The difference between the latter two is that Betterland is landscape-oriented, while Betterport is portrait-oriented.
You can find more about the different templates at the posterdown wiki.
Step 3: Personalize ✨
After you’ve selected a template (I’ve gone with Posterdown HTML), you can simply 🧶 knit 🧶 it to see what the generated html document looks like. Next, you can personalize the poster to your liking, starting with the yaml at the top of the document (i.e., all the metadata specified between ---, such as title and author).
The posterdown package allows for quite a bit of customization. For example, you can set the dimensions of your poster using poster_height and poster_width; set fonts for the text and title of the poster using font_family and titletext_fontfamily; and you can set colors using primary_colour, secondary_colour, and accent_colour. For a comprehensive list of the yaml options, check out the Wiki of your chosen template.
Icons
Since we’re using R Markdown to create our poster, we can use any R package to further customize it. For example, I really like to use icons, so I used the icons package for this. First, I installed and loaded the icons package.
remotes::install_github("mitchelloharawild/icons") #install icons package
library(icons) #load icons package
Next, you can write inline code (code between single back ticks) to customize your poster with icons. For example,
`r icons::fontawesome("github")`
will create an inline github icon:
If you’d like to further customize your icons, you can wrap the code above with the icon_style() function and pass additional comma-separated arguments, such as scale and fill to set the size and color of the icon.
For example,
`r icon_style(icons::academicons("osf"), scale = 2, fill = "#035AA6")`
will create a larger OSF icon in blue:
CSS
If you’re like me, you might want to customize your poster even more. In that case, posterdown allows you to pass a css file with further customizations. For example, as you may have noticed from spending more than 5 seconds on my website, I really like this color. I wanted all my bold text to show up in this color, so I did the following two things:
Create a css file with further customizations
First, I created a style.css file in my working directory (i.e., the place where my .Rmd is located). In this css file, I specified my preferred color for bold text:
:root {
  --text-bold-color: #035AA6;
}

strong {
  font-weight: bold;
  color: var(--text-bold-color);
}
Reference the css file in the yaml
After creating my style.css file in the working directory, I referenced it in the metadata of my Rmd:
output:
  posterdown::posterdown_html:
    self_contained: true
    css: style.css
Et voilà! My bolded text is now in my favorite shade of blue.
Step 4: Share 📡
You will likely want to share your poster with an external audience; to do so, it helps to create a self-contained document by setting self_contained: true under output. In addition, I knew that I wanted to automatically generate a PDF for sharing, so I added the following line to my yaml:
knit: pagedown::chrome_print
And that’s it!

Acknowledgements 🙏🏼
❤︎ The posterdown package was developed by Brent Thorne
❤︎ The icons package was developed by Mitchell O’Hara-Wild
I hope this was helpful! Feel free to leave a comment